By using the recipes section in Breww, you can say goodbye to your clipboard, paper, and calculator, as Breww will take care of your ingredient additions, brew sheet actions, and calculations for you!
Whilst Breww can’t currently build your recipes for you, you can make a whole host of your day-to-day operations more efficient, with the additional benefit of automatically maintaining traceability for your beer batches, as the recipe you enter will marry up with a live electronic brew sheet that you can use!
To create a recipe, head to Production → View → Recipes → New recipe, where you can type in your Batch volume, Wastage, and brewhouse efficiency (your brewhouse efficiency is not auto-calculated, and this is for your own records). Our Understanding recipe and batch volumes in Breww article will help give you an understanding of how batch volumes are used in Breww, and what figures should be entered.

It is worth noting that the recipe’s expected wastage can have some bearing on the valuation of products that have come from a batch using this recipe. You can read more on this in our guide on How does Breww value stock & what are the options for configuring wastage.
Have a recipe built in BeerSmith, Brewfather or any other recipe builder that allows you to create a BeerXML file; then you can also import your recipe here! Check out our How to import recipes using a BeerXML file guide for more information.
Adding recipe stages
When creating your recipe, you can organise your brewing actions into different stages, referred to in Breww as ‘Stage types’, and these are listed in the recipe section by selecting Stage types. There are a selection of existing stage types listed; for example, Mash, Boil and Fermentation. Each stage type is also assigned a category, for example, Brewing for the mash and boil stage types, and Fermenting for the fermentation stage type. You can add your recipe stage types by selecting New stage type.
When you are in your recipe, you can select Add stage to add your stage types (you can also add new types by selecting the ![]() ). You then have the option as to whether to auto-allocate and pre-allocate stock for the stage and select whether this stage is repeated per turn. For more on multi-turn batches, then please see our Multi-turn batches help guide!
). You then have the option as to whether to auto-allocate and pre-allocate stock for the stage and select whether this stage is repeated per turn. For more on multi-turn batches, then please see our Multi-turn batches help guide!
Please note that when entering your ingredient additions, you enter the full quantity required for the total volume of the recipe, and don’t enter the amount you would enter per turn, as Breww will be able to auto-calculate this for you when scaling multi-turn batches.

Adding recipe actions
Once a stage has been added, you can add recipe actions to these stages from the list below.
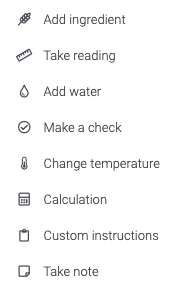
These actions can then be applied, for example, your ingredient additions and temperature readings, as shown in this example.

Any hop additions can auto-adjust, depending on the alpha acid if you want this to auto-calculate your bittering additions!

For gravity, pH and temperature readings on stages categorised as Fermenting or Post-fermentation, you can select whether this is passed on to the Analysis tab on the batch. This is particularly handy when entering your OG on your brew sheet, meaning that this is automatically applied.

Readings, tags and calculations
When taking readings, you can also tag these, enabling you to build calculations into your recipe for your brew day. This is also great for reporting, allowing you to report on specific data across your batches
Please note that the calculations that you add to your recipe are for the purpose of calculating your brew day readings and checks and are not designed to calculate your ingredient additions.
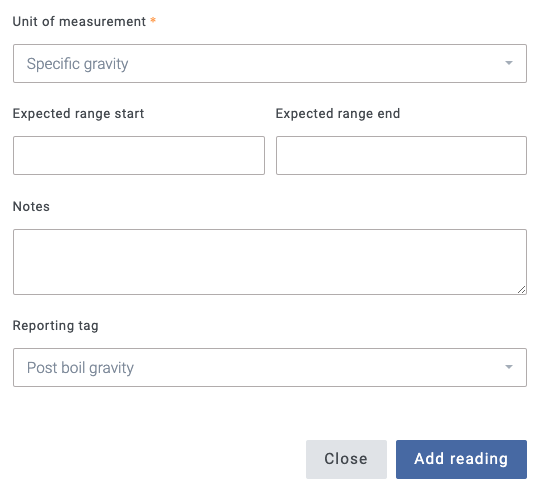
How to tag
Breww has a selection of pre-set tags that you can use, but you can also create your own by heading to Tags & fields → Add new in the recipes section, under Reporting tags. In the example below, I have created the tag Post boil gravity.

These tags can then be applied to your reading or check actions in your recipe. Here I have added the reporting tag for the Post boil gravity that I created.
How to build a calculation
Once all your tags are applied, you can start to build in your calculations by heading to Tags & fields → Add new in the recipe section and selecting Add new under calculations. You can then create a title for this calculation; in this example, it will tell us the Litre degrees. You can then go to the Formula box and enter the following using the tags that you have created and save this calculation.
post_boil_gravity*volume_in_fv
Return to your recipe edit, go to the appropriate stage, and press Add action → Calculation → Calculated field. Your calculation will now be here, and you can add this to your recipe. Next time you brew, when you enter the post boil gravity and the volume in FV, the litre degrees will now be calculated for you!
You can then carry on this process to create multiple calculations from other tags and even create calculations from calculations!
Brew sheets
Once you have entered and saved your recipe, this will be set against the beer. The next time you start a batch, you can select the recipe, and Breww will input the ingredients that have been entered against the recipe. You will then have the option to Manage your brew sheet by selecting the Manage brew sheet button or the Brewing symbol on the batch. Our Brewsheets/Brewing page in Breww - adding ingredients and marking “complete” help guide outlines how your brewsheets and brewing page works in Breww.

You can then simply follow your recipe stages by marking the additions as complete and entering any readings, with the added ability to enter any notes about the brew day.

Your calculations will now also be live, allowing you to simply enter any readings, with the results immediately displayed for you. Using the example from earlier, when populating the recipe, you will now see that the litre degrees have been calculated, with an additional calculation added, which tells you the liquor back quantity of 214L needed to hit your OG.

When you are on your brew sheet, your stage types are also categorised. In this example, there is a single turn on the batch, that contains the brewing stages, with the post-brewing stages e.g. Fermentation, listed under the next tab called Post-brewing stages

Just getting started with Breww? Click here to move on to the next step of ‘Getting ready to go live’.